Contents
1. Introduction
In Part 1 of this Apache POI Excel guide, we examined how to create an Excel spreadsheet and add data to it. We also looked at properly storing data into cells to avoid “Number Stored as Text” errors.
In this chapter, let us look at some more options for formatting data within an Excel spreadsheet.
2. Convert CSV to Excel
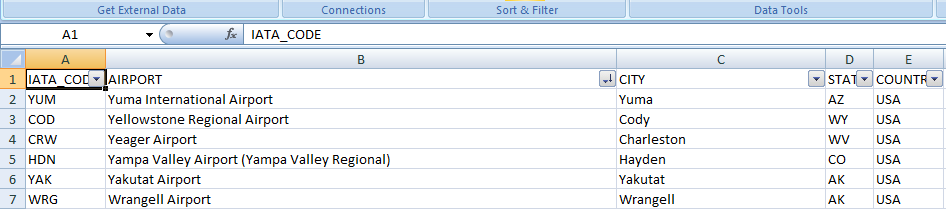
Let us see how we can convert CSV to an Excel spreadsheet. Excel offers this functionality with the Data Import Wizard when you attempt to import a CSV or text file. Here we show you how to use Apache POI to parse CSV and output an Excel Spreadsheet.
Workbook wb = new XSSFWorkbook();
CreationHelper ch = wb.getCreationHelper();
String safeName = WorkbookUtil.createSafeSheetName("Population");
Sheet sheet = wb.createSheet(safeName);

try (InputStream in = new FileInputStream(csvFile);) {
    CSV csv = new CSV(true, ',', in);
    List<String> colNames = null;
    if ( csv.hasNext() ) {
	colNames = new ArrayList<String>(csv.next());
	Row row = sheet.createRow((short)0);
	for (int i = 0 ; i < colNames.size() ; i++) {
	    String name = colNames.get(i);
	    row.createCell(i).setCellValue(name);
	}
    }

    int rowNum = 0;
    while (csv.hasNext()) {
	List<String> fields = csv.next();
	rowNum++;
	Row row = sheet.createRow((short)rowNum);

	/* First 5 fields are text. The next 2 are floating
	 * point. */
	for (int i = 0 ; i < 5 ; i++) {
	    String value = fields.get(i);
	    row.createCell(i).setCellValue(value);
	}

	for (int i = 5 ; i < fields.size() ; i++) {
	    /* Attempt to set as double. If that fails, set as
	     * text. */
	    try {
		double value = Double.parseDouble(fields.get(i));
		row.createCell(i).setCellValue(value);
	    } catch(NumberFormatException ex) {
		String value = fields.get(i);
		row.createCell(i).setCellValue(value);
	    }
	}
    }
}

for (short i = sheet.getRow(0).getFirstCellNum(),
	 end = sheet.getRow(0).getLastCellNum() ; i < end ; i++) {
    sheet.autoSizeColumn(i);
}

FileOutputStream fileOut = new FileOutputStream(xlsFile);
wb.write(fileOut);
fileOut.close();
Here is what the spreadsheet looks like:

3. Adding Filter Headers
To automatically turn on filtering on some or all the columns of data, use the method setAutoFilter(). The code below turns on auto filtering for all the columns.
for (short i = sheet.getRow(0).getFirstCellNum(),
	 end = sheet.getRow(0).getLastCellNum() ; i < end ; i++) {
    CellRangeAddress ca =
	new CellRangeAddress(0, rowNum,
			     sheet.getRow(0).getFirstCellNum(),
			     sheet.getRow(0).getLastCellNum());
    sheet.setAutoFilter(ca);
}
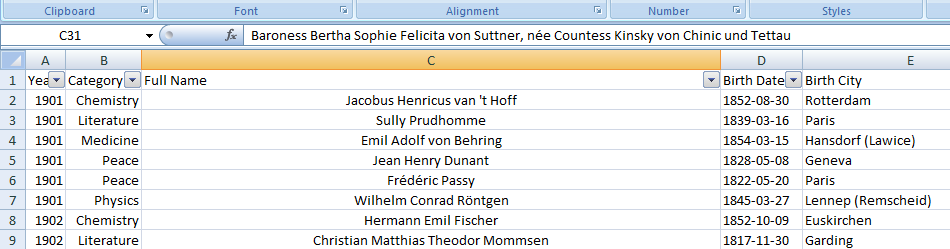
As you can see in the pic below, all columns have the Excel Filter drop-down enabled.
4. Formatting Date Cells
To format a cell as a date, you have to set the cell value as a Date and associate a date format with the cell.
Create a cell style with a suitable date format as follows:
Workbook wb = new XSSFWorkbook();
CreationHelper ch = wb.getCreationHelper();
CellStyle dateStyle = wb.createCellStyle();
dateStyle.setDataFormat(ch.createDataFormat().getFormat("d-mmm-yy"));
Parse the text to a Date using SimpleDateFormat. and associate the cell style as show below. (Creating and using the cell style is expensive. Create, store and re-use it to avoid re-creation.)
SimpleDateFormat datefmt = new SimpleDateFormat("yyyy-MM-dd");
...
String value = ...;
Date date = datefmt.parse(value);
Cell cell = row.createCell(i);
cell.setCellValue(date);
cell.setCellStyle(bdateStyle);
5. Cell Alignment Options
You can align cell data with a variety of options. For horizontal alignment, this involves setting the cell style to HorizontalAlignment.CENTER or HorizontalAlignment.RIGHT.
Workbook wb = new XSSFWorkbook();
CellStyle hcenter = wb.createCellStyle();
hcenter.setAlignment(HorizontalAlignment.CENTER);

CellStyle hright = wb.createCellStyle();
hright.setAlignment(HorizontalAlignment.RIGHT);
Set the cell style for each cell.
Cell cell = row.createCell(i);
cell.setCellStyle(hright); // as appropriate
cell.setCellValue(value);
6. Text Wrapping
There is an option to enable text wrap using the cell style. It is enabled as follows:
CellStyle wrap = wb.createCellStyle();
wrap.setWrapText(true);
With this style set on a cell, Excel may not actually display cell data on multiple lines. This could be because the row height is set to a specific height preventing the display of multiple lines.
![]()
To set the row height to display multiple lines, do the following in Excel. (From here.)
On the Home tab, select Format in the Cells group.
![]()
Under Cell Size, select AutoFit Row Height. Now you can see the text has been wrapped and is visible.
![]()
Summary
In this article, we looked at some more options for formatting an Excel spreadsheet using Apache POI. We covered converting CSV data to Excel, Adding sort headers to columns and date formatting. In addition, cell styles can be used to set up alignment and text wrap options.
Hi,
Auto Filters is not applied in the excel sheet(.xlsx format). Is there any other way to do it?
for (short i = sheet.getRow(0).getFirstCellNum(),
end = sheet.getRow(0).getLastCellNum() ; i < end ; i++) {
CellRangeAddress ca =
new CellRangeAddress(0, rowNum,
sheet.getRow(0).getFirstCellNum(),
sheet.getRow(0).getLastCellNum());
sheet.setAutoFilter(ca);
}